Contents
Microsoft's Visual Studio is the major integrated development environment (IDE) for a variety of Microsoft and Intel compilers on the Windows platform. If you are using the Microsoft C/C++ compiler, Visual Studio contains built-in debugging features that are useful for both serial and parallel codes. What follows is a quick-reference guide on how to use a special debugger plug-in with Visual Studio and Microsoft C/C++ to launch a parallel debugging run quickly and easily on the HPC Server 2008 cluster.
The MPI Cluster Debugger, with the launch integration package, lets you:
Let's assume you have already created an MPI application and that you have previously used Visual Studio to compile and link the application with the MS-MPI library. Perhaps you now find your code freezing up due to deadlock, or giving unpredictable answers due to a race condition. The use of a parallel debugger can help to isolate the source of these problems like these.
After opening up your Visual Studio solution file, the first step in preparing to use the MPI Cluster Debugger is to examine the Properties of the project you wish to debug. To activate the debugger, make the following changes to the Property Pages:
The next step is to choose Cluster Debugger Configuration from the Tools menu. A new pane (tab) should open at the right side of the GUI. Here's what the configuration pane might look like when it's filled out with entries appropriate for the V4 cluster at CAC:
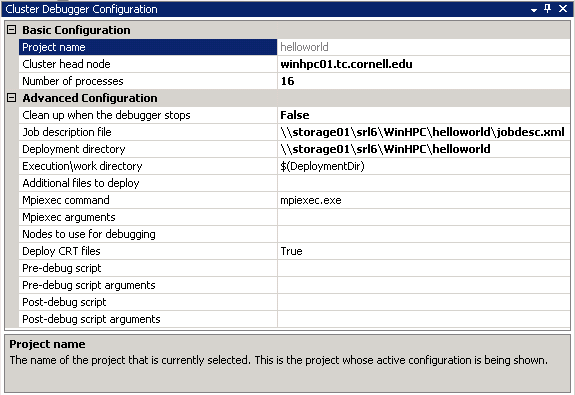
Other entries are less crucial. In the above example, "Clean up when debugger stops" and "Deploy CRT files" have been set to "false" and "true" respectively to allow the viewing of all deployed files plus associated runtimes at the end of the debugging session. (Look for these in a subdirectory called myusername in the deployment directory.)
Within this pane, highlighting any item in the left column causes further information on that item to appear at the bottom of the pane.
You can copy and paste the text below to create your job description file. The following attributes within the Job start-tag should be edited to match your own requirements: Name, MinNodes, MaxNodes, Project, Owner.
<?xml version="1.0" encoding="utf-8"?>
<Job Version="2.000"
  Id="17"
  Name="hello_debugger"
  CreateTime="9/16/2009 5:45:29 PM"
  ChangeTime="9/16/2009 5:45:29 PM"
  UnitType="Node"
  MinNodes="2"
  MaxNodes="2"
  RunUntilCanceled="false"
  IsExclusive="true"
  ErrorCode="0"
  ErrorParams=""
  State="Configuring"
  PreviousState="Configuring"
  JobType="Batch"
  Priority="Normal"
  IsBackfill="false"
  SoftwareLicense=""
  NextTaskNiceID="2"
  HasGrown="false"
  HasShrunk="false"
  OrderBy=""
  RequestCancel="None"
  RequeueCount="0"
  AutoRequeueCount="0"
  FailureReason="None"
  PendingReason="None"
  AutoCalculateMax="false"
  AutoCalculateMin="false"
  ParentJobId="0"
  ChildJobId="0"
  NumberOfCalls="0"
  NumberOfOutstandingCalls="0"
  CallDuration="0"
  CallsPerSecond="0"
  ProjectId="1"
  JobTemplateId="1"
  OwnerId="3"
  ClientSourceId="3"
  Project="dal16_0001"
  JobTemplate="Default"
  DefaultTaskGroupId="17"
  Owner="CTC_ITH\srl6"
  ClientSource="HpcJobManager"
  xmlns="http://schemas.microsoft.com/HPCS2008/scheduler/">
   <Dependencies />
   <Tasks>
   </Tasks>
</Job>
First, set a breakpoint by clicking in the left margin next to the line of source code where you want execution to break. All processes will break when they reach this point. Make it well after MPI_Init and (say) MPI_Comm_rank if you want to view the local process's rank and similar variables for each process.
All you have to do to get going is press the F5 key! Equivalently, you can choose "Start Debugging" from the Debug menu. The scheduler will launch your job immediately if the requested number of nodes is available. The IDE will automatically connect to the processes started by the scheduer and load the appropriate debug panes. In addition to the source, you will most likely want to view Processes and Locals (i.e., the local in-scope variables for a particular process). If these panes are not visible, select them from Debug > Windows. As the requested processes join your job, you will see their names appear in the Processes window.
When you double-click on a name in the Processes window, Visual Studio will display that process's current position in the source (yellow arrow) and the locals for that process. The active process can be advanced using a Step or Continue (F5) command.
If no error is encountered, you can end the job by hitting F5 as many times as necessary for all the processes to run to the end. If an exception occurs, you can use the debugger as you normally would. To recover from other situations, "job list" and "job cancel" from a command window can help you to flush the wayward batch job.