PuTTY and Xming
Special clients are necessary for connecting to Linux from Windows via SSH, or the Secure SHell protocol. PuTTY and Xming are two commonly used Windows clients that have a long track record. While other, more recent choices are available, these two are documented here for completeness.
Using PuTTY for SSH
In Windows, instead of using ssh from the command line, a separate SSH client can be installed and used. A popular client for Windows is the free PuTTY client.
- The simplest installation is to download the Windows installer (having the file extension .msi) and run it. This installs PuTTY into your Start menu.
-
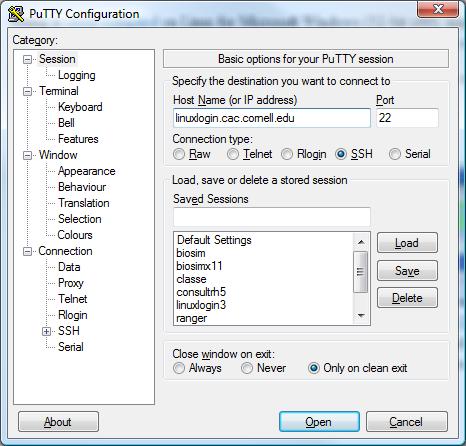
To connect, start PuTTY, then type in a host name such as linuxlogin.cac.cornell.edu, and click "Open".
-
Tip for advanced users: a slight inconvenience is that in order to use Public Key Authentication with PuTTY, your private key must first be converted into PuTTY's special "PPK" format using PuTTYgen.
X-Windows with PuTTY
Linux uses the X Window System, also called X-Windows or X11, to display graphics. Graphical output or graphical interfaces from Linux will appear on your Windows workstation only if you have an "X server" such as VcXsrv or Xming running locally.
Here is how to start a X-Windows-capable session using PuTTY and either VcXsrv or Xming.
- Start VcXsrv or Xming from the Start menu. It will appear briefly and disappear except for an X in the application tray. (Note, the first time you start VcXsrv, you will need to do a few configuration steps.)
- Start PuTTY.
- In the window that appears, type a host name, e.g., linuxlogin.cac.cornell.edu.
-
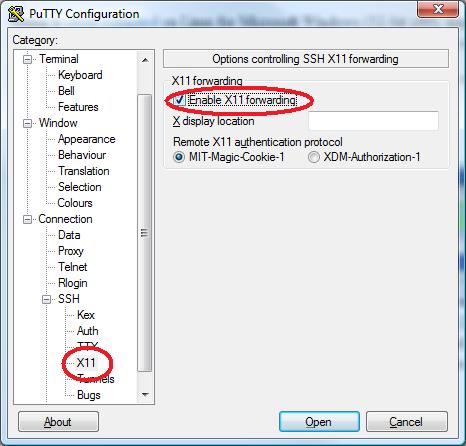
Use the tree menu on the left to set X11 forwarding. It's in the Connection > SSH branch.
-
You can return to the Session category and Save this session's configuration for future use. Give it a logical name like linuxlogin.
- Click Open, and it will connect to the CAC general login node.
- Note for PuTTY 0.61 and above - If an "Access denied" message appears in your terminal window for no good reason, you can prevent this annoyance in future sessions by going to the "GSSAPI" area in the "Auth" section of the SSH branch, and unchecking the "Attempt GSSAPI authentication" box there.
Whichever Windows client and X server you choose, you should test your X-Windows setup by typing the command for Ghostscript, which is a PostScript and PDF previewer:
linuxlogin$ gs # on another system, you want to might try a different X-capable client, like xterm
A blank window should appear on your screen. You can stop it by typing Ctrl-c in the terminal window. If you encounter a problem with gs, follow the steps in Using X-Windows.
Public Key Authentication with PuTTY
The way to proceed with public key authentication in Windows depends on the SSH client you are using. Here, we cover PuTTY. We assume you have already generated or copied an SSH key pair as described in Public Key Authentication, without assigning a passphrase to it. The next step is to use PuTTYgen to convert the SSH private key, id_rsa, for use with PuTTY and plink.
- Run "C:\Program Files (x86)\Putty\puttygen.exe".
-
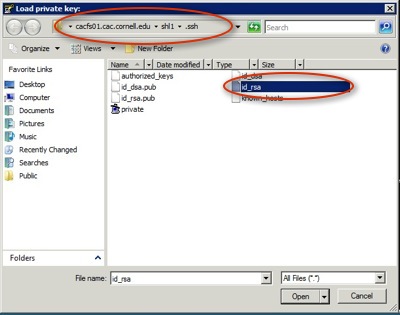
Select Import Key from the Conversions menu and enter C:\Users\<your_local_username>\.ssh in the address bar, assuming this is where you placed your private key in your home directory. Then, select the id_rsa file and click on the Open button.
-
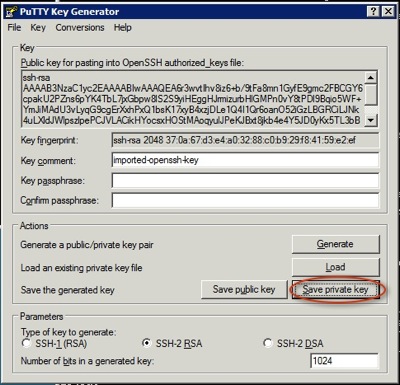
Click on the "Save Private Key" button.
-
Click on "Yes" when asked to save the private key without a passphrase.
-
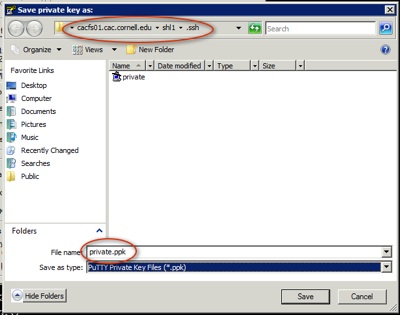
Save the private key as private.ppk in the .ssh directory inside your home directory.
-
Close (choose File, then Exit)
-
To confirm you have converted the ssh private key successfully, do:
"C:\Program Files (x86)\Putty\plink.exe" -i %USERPROFILE%.ssh\private.ppk
@linuxlogin.cac.cornell.edu
You may be notified that "The server's host key is not cached in the registry." Type "y" to store the key in cache. If everything was done correctly, you should now be logged in to linuxlogin without being prompted for a password. Type exit to log out.
In PuTTY, you will want to update your Saved Session for linuxlogin to use the new key. Load the linuxlogin session. Navigate to "Connection > SSH > Auth", browse to %USERPROFILE%.ssh and open the id_rsa file. Go back to Session and click Save. Now you won't need to enter a password for linuxlogin ever again!
Using Xming for X-Windows
Xming was at one point an open source project before moving to a proprietary model. Even though the public domain release of Xming is quite old, it still works fine with Windows 10 and up. For a donation, you can download a more up-to-date "website release" with improved performance for graphics (GLX) and other enhancements. As described at the author's website, there are two pieces to download:
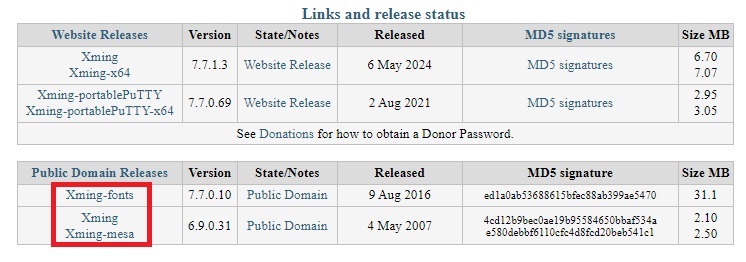
Whether you choose to download the free version of Xming or purchase the newer website release, remember to install the Xming-fonts, as well.